So I’ve been wanting to expand my home server hosting capabilities. I’ve got a load of things I host at home. Just a few of them are:
- I run the controller for my home SDN (software defined network), which probably warrants a post of it’s own, in Docker! I personally run TP-Link Omada hardware.
- I host a GitLab runner, to allow me to run CI for my jobs in GitLab for free!
- I run Owncloud so I can have my own ‘Dropbox’ at home (with terabytes of storage!)
- Tautulli which is a monitor for my Plex server.
So to that end… I bought a job lot of mini PCs off eBay. I was partially inspired by the ServeTheHome Project TinyMiniMicro series (one of their excellent articles is here), as well as some YouTubers experience with Raspberry Pi clusters. I thought about picking up one of the Raspberry Pi racks available for 4-5 Pis (I had my eye on this one for a while…) but at the end of the day, I feel I need more power than is available in your standard Raspberry Pi.
A few reasons for this choice really. I feel SD cards don’t really cut the mustard when it comes to self hosting a lot of my services. I know you can run SSDs or flash drives on a Pi but, once you factor in everything needed to run something like that, the overall cost is quite high. The only thing that did appeal was using a load of PoE+ HATs with Pis (as I have a powerful PoE+ switch!) but the price really adds up for multiple nodes.
For me, I purchased a job lot of 5 HP Elitedesk 800 G2 Mini computers. These have clearly been pulled from an office or something like that, but they are in decent shape and came with 256GB SSDs (from the SMART data they are quite heavily used, but that’s OK) and 8GB of RAM each, as well as Core i3 6100T CPUs. These are not super powerful by any means, but this does mean that these servers will sip a lot less power than the average PC. The power brick is rated at 35W but I highly doubt these will use anywhere near that under normal usage. I also have the option of adding NVMe SSDs.
Initial machines setup
My machines have come with pretty old BIOS images. As they are business machines, they actually come with a network BIOS updater (which is pretty awesome). I decided to jump straight to latest. They did a reboot and some scary beeping, but it came back up with no issues after a couple of minutes. The other thing is that I needed to connect via VGA to be able to use the BIOS and Proxmox installer. A bit of an inconvenience, but considering I have one and once Proxmox is installed I won’t have to touch it again - I’ve got no problem. If I needed to I could get an active VGA to HDMI adapter to connect it to a more modern machine (or a KVM like Pi-KVM, which I have my eye on when they are available!)
Proxmox
Proxmox is super easy to install. I basically downloaded the ISO from the website, used balenaEtcher to write that to a USB stick then installed it on each machine. I’ve also followed Networkchuck’s excellent Proxmox starter video as well as Craft Computing’s video on this subject which helped me a lot to get stuff sorted, as well as getting Proxmox.
Why Proxmox?
- Central management! All browser based and ‘datacenter’ level management. (Over ESXi, which I have previous experience with, which doesn’t have free clustering)
- Keeping things up and running! This is especially important for my Omada controller and CCTV host.
- Flexiblity - I like the ability to create VMs. My current setup is a few VMs on a Windows machine under HyperV, but it’s not a ‘server’ at the end of the day and has the usual Windows 10 issues like rebooting at random times. Use Linux for servers, pretty much always. There are exceptions of course, but for the vast majority of things I’d always be a linux server guy.
Once you are installed, it’s easy enough to get sorted.
IP and Networking
Change the host IP address and set a VLAN for the host with Tagged VLANs
For my uses however, I wanted to use a VLAN and put my Proxmox hosts in the VLAN (as well as the servers), and subnet.
There are 2 options with VLANs. Tagged VLANs and Untagged VLANs. This is a new thing to me, but for my uses I tried setting up Tagged VLANs, but at the end of the day it was easier for me to use Untagged VLANs. However this was my first attempt, going for tagged VLANs. I had mixed results here, and it was difficult to get working consistently so I would recommend experimenting yourself if you’re interested in a tagged VLAN setup.
In my Omada SDN Gateway, I setup a VLAN - I chose 53. (53 looks like SE, the first 2 letters of server!)
Then in the shell (which can be scary!) we need to take a backup of the existing network interface file, then modify it.
So I copied the interfaces file to a safe place to back it up (actually after a reboot these disappeared so maybe pick somewhere else…):
cp /etc/network/interfaces /root/networkinterfaces.bak
Then, we open the /etc/network/interfaces file in nano (I’m still using root so no sudo needed).
nano /etc/network/interfaces
In my case, I want to use VLAN 53 and set the IP of 192.168.53.11 for my first Proxmox host. (I’ll use 12 and 13 respectively for hosts 2 and 3).
For me, this is my setup.
# These lines were here already
auto lo
iface lo inet loopback

iface eno1 inet manual

# Newer lines below
auto vmbr0.53
iface vmbr0.53 inet static
        address 192.168.53.11/24
        gateway 192.168.53.1

auto vmbr0
auto vmbr0 inet manual
        bridge-ports eno1
        bridge-stp off
        bridge-fd 0
        bridge-vlan-aware yes
        bridge-vids 2-4094 # If I want to limit VLANs, I can modify this line with smaller ranges
Then, I rebooted the node. I did have to iterate and try a few bits and pieces. The Proxmox docs on VLANs aren’t very detailed on these points unfortunately, I didn’t find they worked first time but I got it sorted eventually.
Then you need to update the hostname - this can be done by editing the contents of the /etc/hosts file and changing the IP of your node/hostname lookup.
I also updated my DNS servers to point at my 2 PiHole servers (1 virtual, 1 on an old Pi). This can be done via the UI easily.
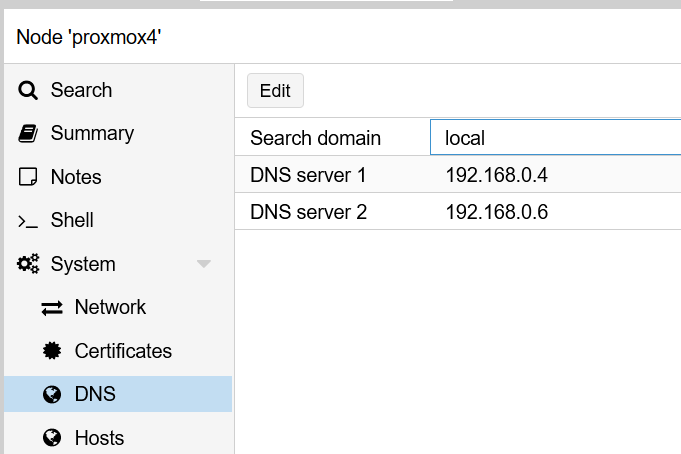
DNS Servers
Using Untagged VLANs
For my usage, I decided to use Untagged VLANs. I won’t go into much detail as I’m no expert on VLANs. However, from what I have read, setting a port on a smart switch to be an Untagged VLAN means that any traffic from the port will be part of the VLAN, but it won’t have the VLAN tag in the packets. So to the device, it doesn’t really know it’s on a VLAN. This is great if your device doesn’t support VLANs (which a lot of consumer hardware doesn’t). However I could also send VLAN-tagged packets for a different VLAN on the same setup.
This requires setup on my SDN (Software Defined Network). I use an Omada SDN at home.
This is my end point: Servers in Omada panel after setup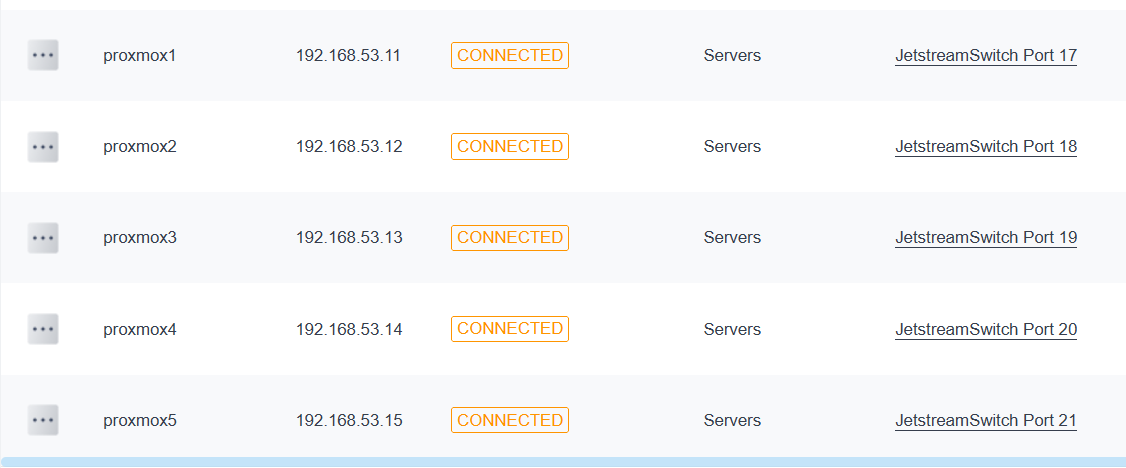
To get this sorted, I had to SSH onto my devices and set the network settings (modifying /etc/network/interfaces) one at a time. This is the same as setting a static IP for any normal network, but for me I’m doing it in the 192.168.53.x range.
auto lo
iface lo inet loopback

iface eno1 inet manual

auto vmbr0
iface vmbr0 inet static
        address 192.168.53.11/24
        gateway 192.168.53.1
        bridge-ports eno1
        bridge-stp off
        bridge-fd 0
        bridge-vlan-aware yes
Then, I need to go into my SDN - for me, I clicked on my Jetstream switch - I have the model TL-SG3428XML v1.0 (which is a nice succinct model name…) which is a 24 1 gigabit port, 4 SFP+ port switch with 380W of PoE power (which I am using for cameras, access points and even a Raspberry Pi). It’s overkill really, but it works well for my uses.
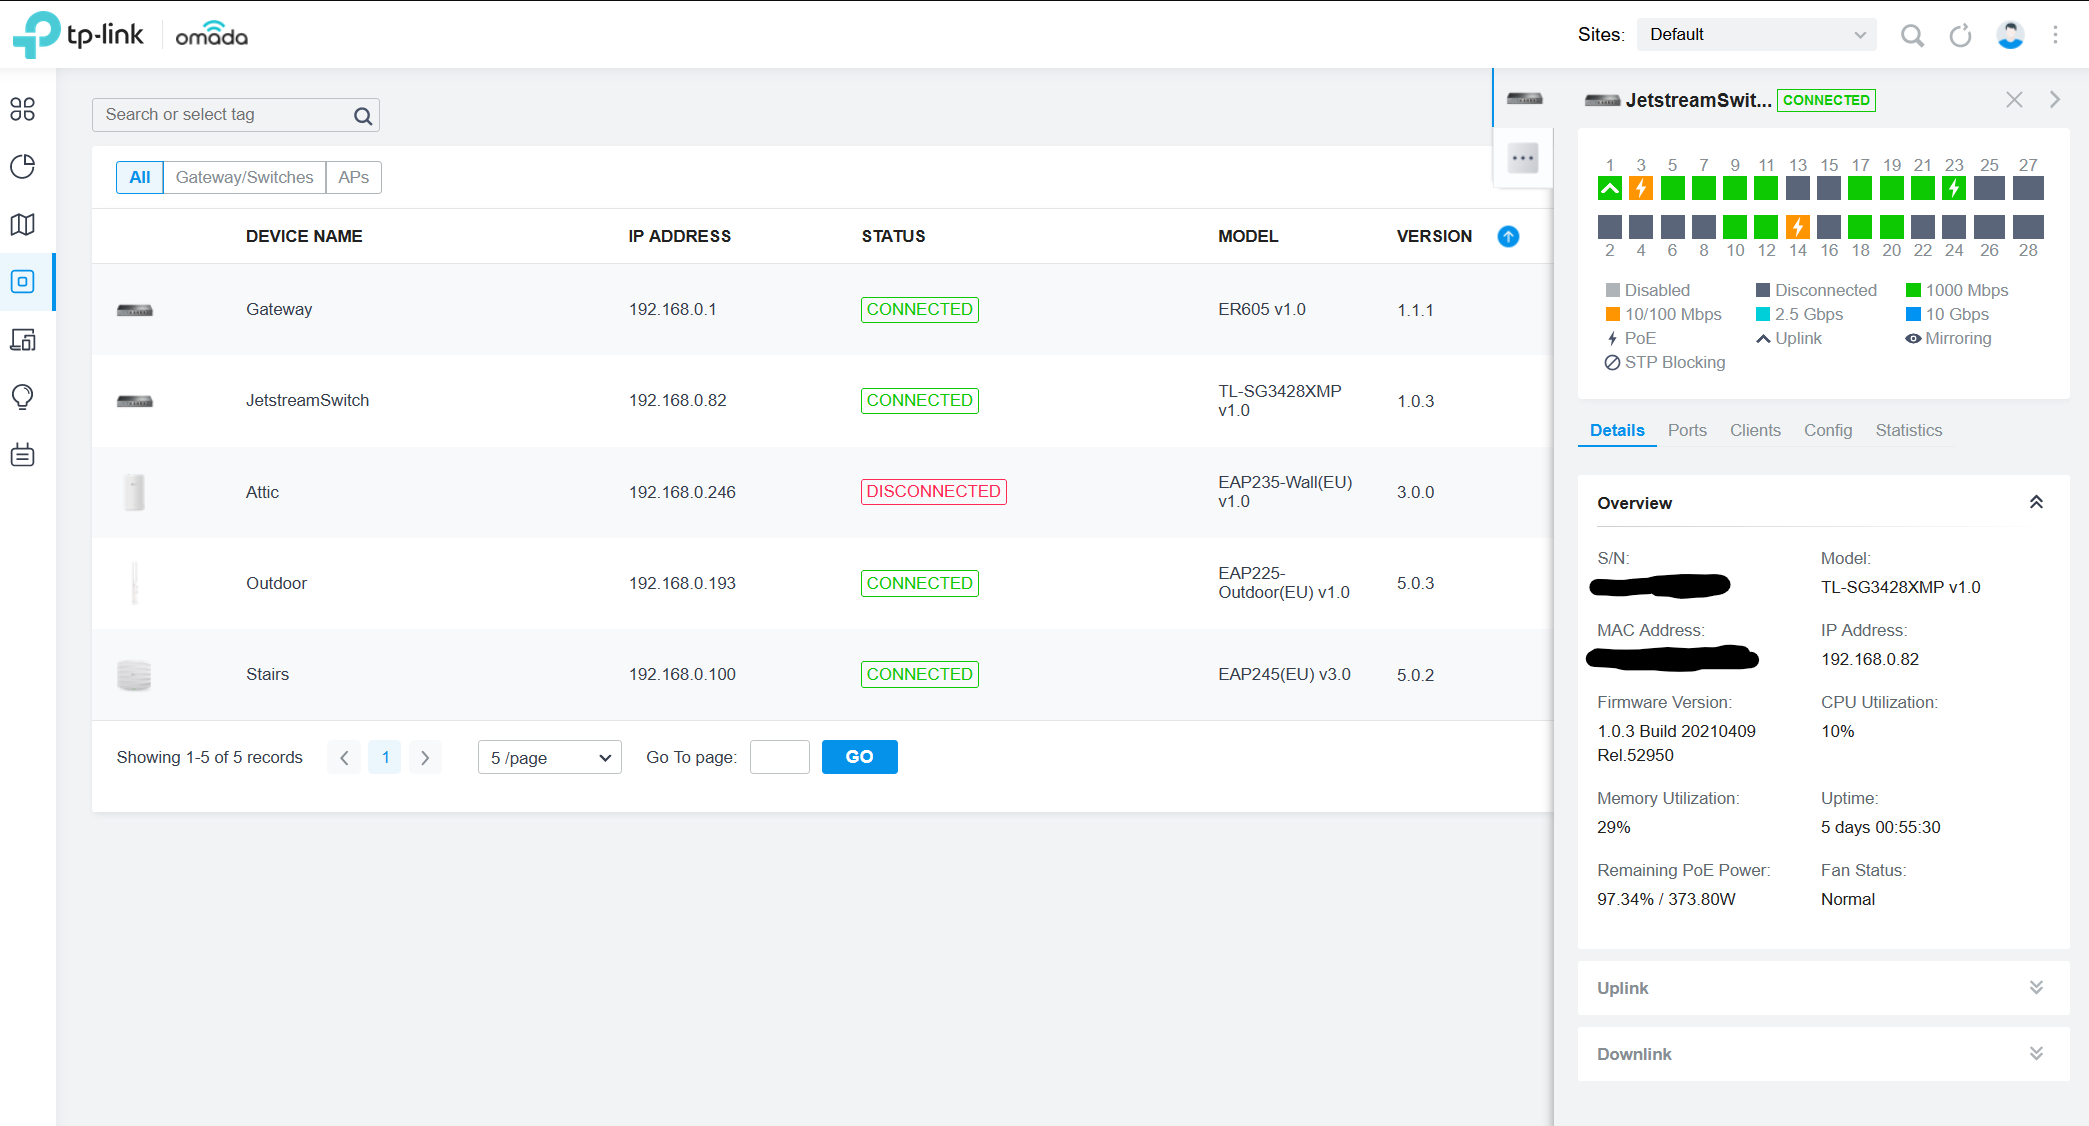
Omada device overview
Then, I need to go to my ports and change them so that the untagged VLAN on the ports is my Servers VLAN.
I need to change ports 17 through 21 for my 5 Proxmox hosts. For me, I edit the port profile.
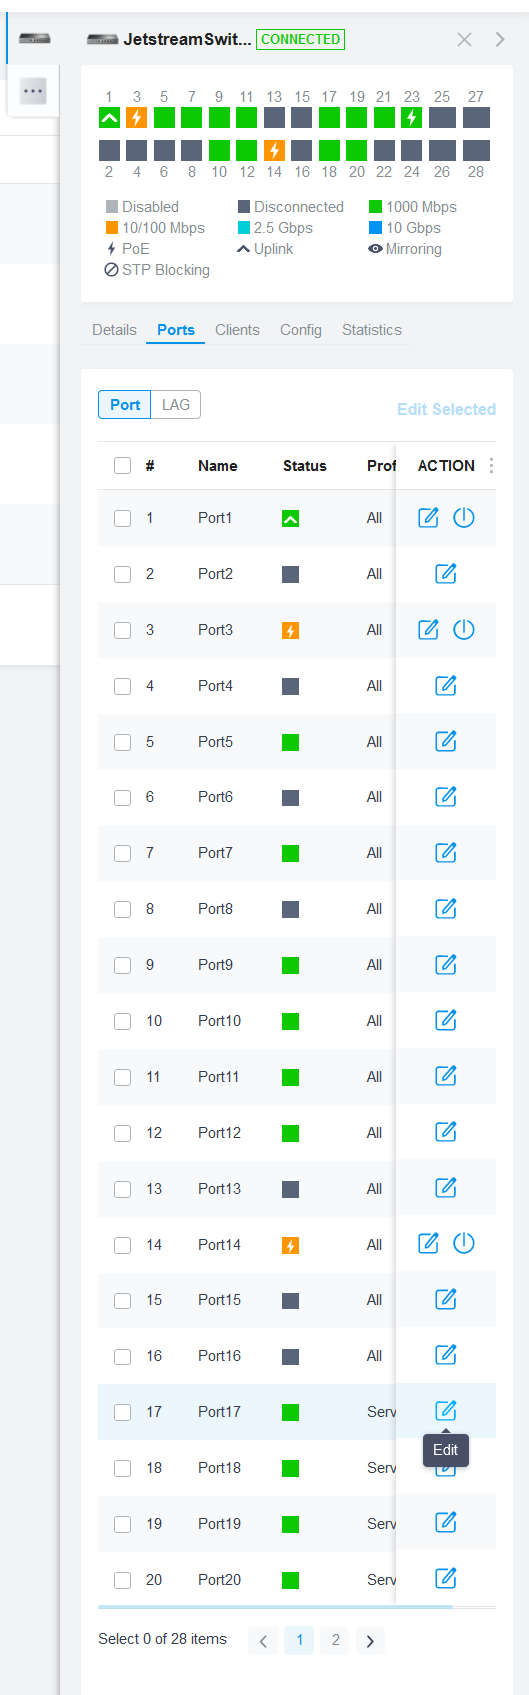
Selecting port 17
Then I set my ‘Servers’ profile.
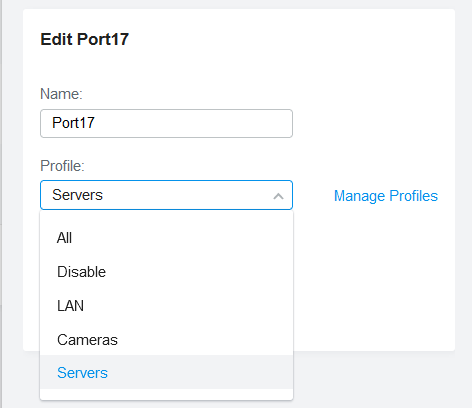
Set Servers profile
This is how my profile is setup - this one was automatically created with my LAN but here is what it looks like anyway; you can clearly see how to set Tagged VLANs if I was interested in that.
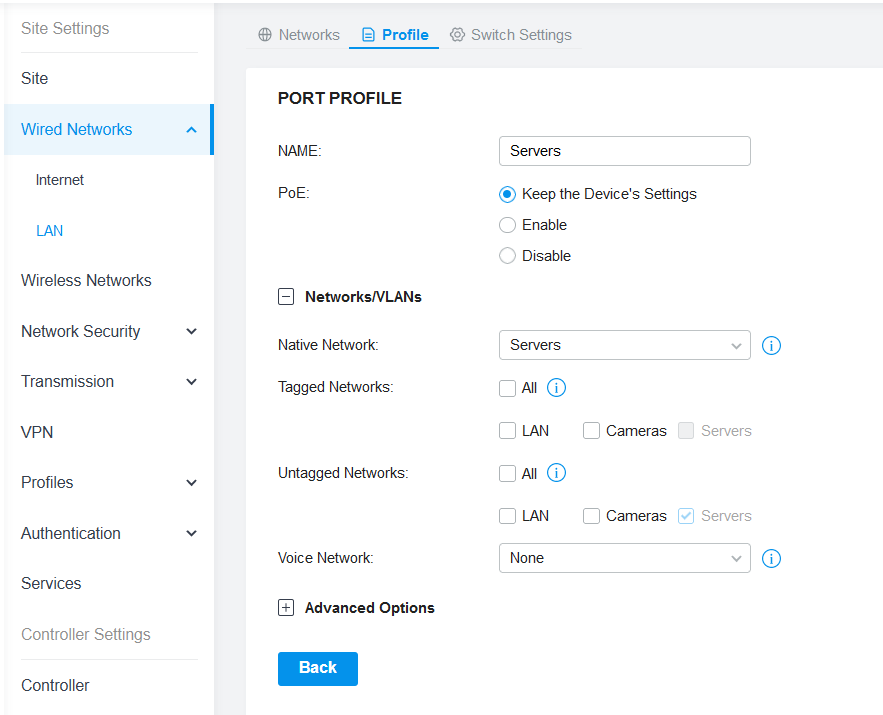
Servers profile
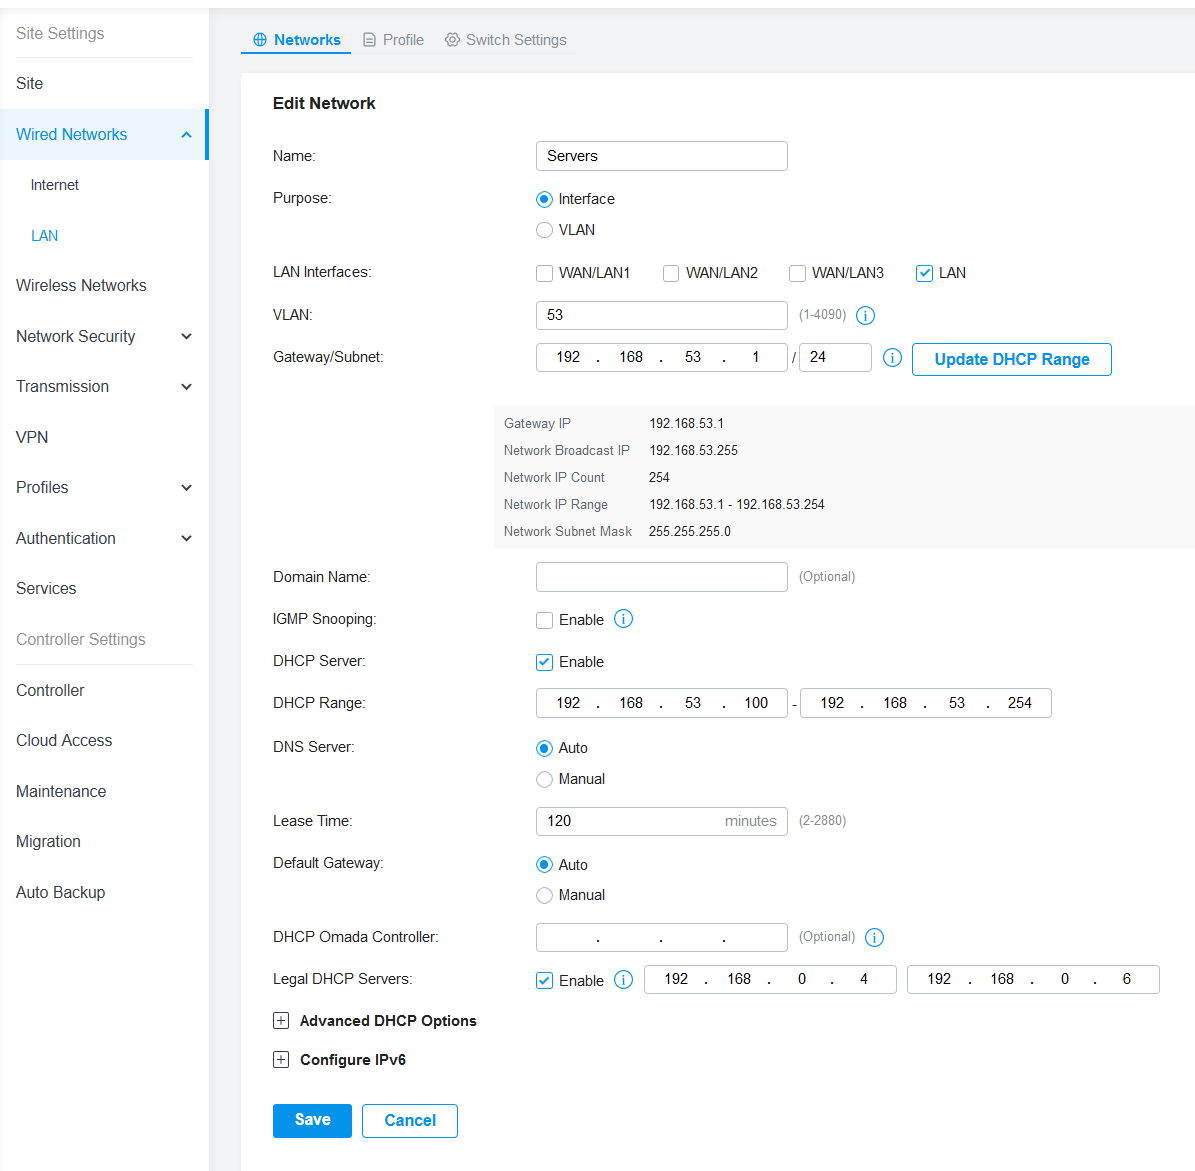
Servers LAN
Fixing the cluster
The first time I did this, I set my IPs up after I clustered. This was a mistake. Do it after.
If you’re like me and need to fix it, I had to do a bit of research and tried a couple of things but none of it worked for me. You might have better luck but I ended up reinstalling from scratch on the nodes I’d already setup. So that’s that. Onto the more interesting bits…
Updates
I copied this guide on setting up the non-enterprise update repo for Proxmox.
Long story short:
Make a copy of the Proxmox enterprise list and call it pve-no-subscription.list:
cp /etc/apt/sources.list.d/pve-enterprise.list /etc/apt/sources.list.d/pve-no-subscription.list
In the original PVE Enterprise list, go in and comment out the line. This means you can enable the enterprise repository easily if you need or want to, but you can modify the new file freely.
In the new file, replace the enterprise deb source with the new line (although, take note of if your version says buster, bullseye, stretch - your version should match the enterprise one)
deb http://download.proxmox.com/debian/pve bullseye pve-no-subscription
After that, you should be able to run:
apt-get update
apt-get dist-upgrade
Interestingly, I normally run apt-get upgrade over dist-upgrade - but it makes a lot of sense reading the notes that running dist-upgrade would make sense, as it seems to install dependencies in a smarter way. So I’ll give that a go for sure.
Datacenter setup
I skimmed over this but it’s basically:
- Go to ‘Cluster’ in your Proxmox setup
- Create a cluster
- Grab the ‘Join information’
- Log on to other nodes (if you have any)
- Go to the ‘Cluster’ settings
- Click ‘Join Cluster’ then use the ‘Join information’ copied previously.
That’s pretty much it. Easy peasy!
Storage
So when I first started up, there are 2 storage partitions. Personally I don’t need that on my small SSDs, so I wanted to go down to 1. To solve that, we’re going to delete one. I’d do this before you setup any VMs…
Click on Datacenter and REMOVE the local-lvm under the Storage tab.
Run these in the shell via the Proxmox console on your node or nodes BEFORE you run any VMs (you’ll probably mess something up if you don’t do it before you make VMs)
lvremove /dev/pve/data
lvresize -l +100%FREE /dev/pve/root
resize2fs /dev/mapper/pve-root
Then you need to go back to your storage settings and allow for Disk images at least (so you can run VMs!) and you might want to store ISO images (probably temporarily, ideally you’d want to store them on a remote server)
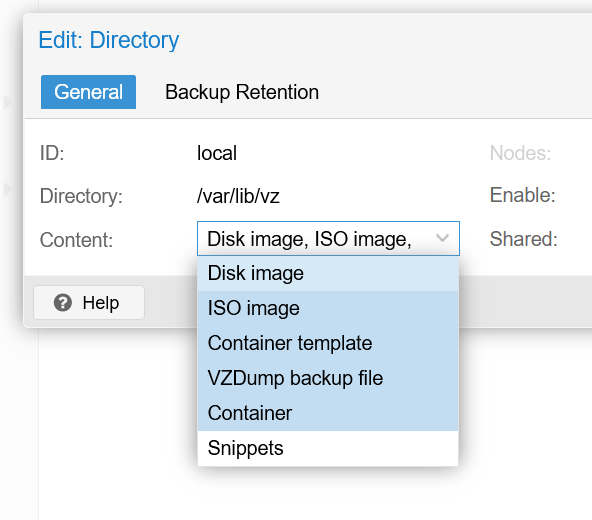
Storage options
Conclusion
I’ve got a lot more plans for my cluster. PiHole is likely my next one to tackle, as the first thing to migrate away from my existing HyperV setup.